How to Install/Uninstall WordPress Plugins Print

  • WordPress, Plugins, WordPress Plugins, Install WordPress Plugin, Uninstall WordPress Plugin
  • 718

There are two primary methods to install a WordPress plugin through the WordPress dashboard: using the plugin search feature or uploading the plugin directly. Alternatively, you can manually install the plugin by placing it in the plugins folder of your WordPress site through FTP.

NOTE: LyteHosting strongly advises creating a full cPanel backup before making any major changes to prevent data loss.

How to Install a WordPress Plugin via the Dashboard

There are two ways to install and activate WordPress plugins.

Option 1: Using the WordPress Admin Plugin Search

STEP 1: Log into your WordPress Admin Panel.

STEP 2: From the left-hand menu, click on Plugins, then choose Add New Plugin.
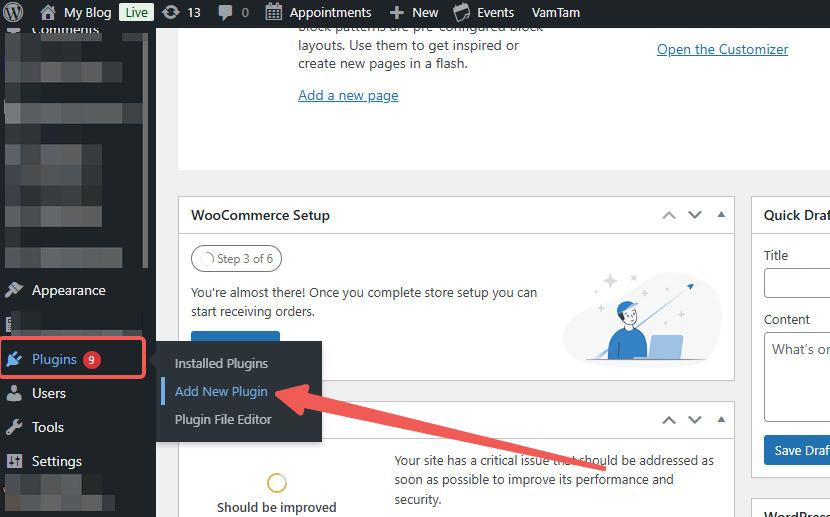
WordPress Admin Panel - Plugins - Add New Plugin

STEP 3: In the Search field, enter the name of the WordPress plugin you're looking for. To refine your search, you can select options from the Keyword dropdown and enter a descriptive keyword, author, or tag. Alternatively, you can use the Categories tabs—Featured, Popular, Recommended, or Favorites—to find your desired plugin.

STEP 4: After finding your plugin, navigate to Classic Editor and click on More Details to view additional information and setup instructions. You can save or print these instructions if needed.
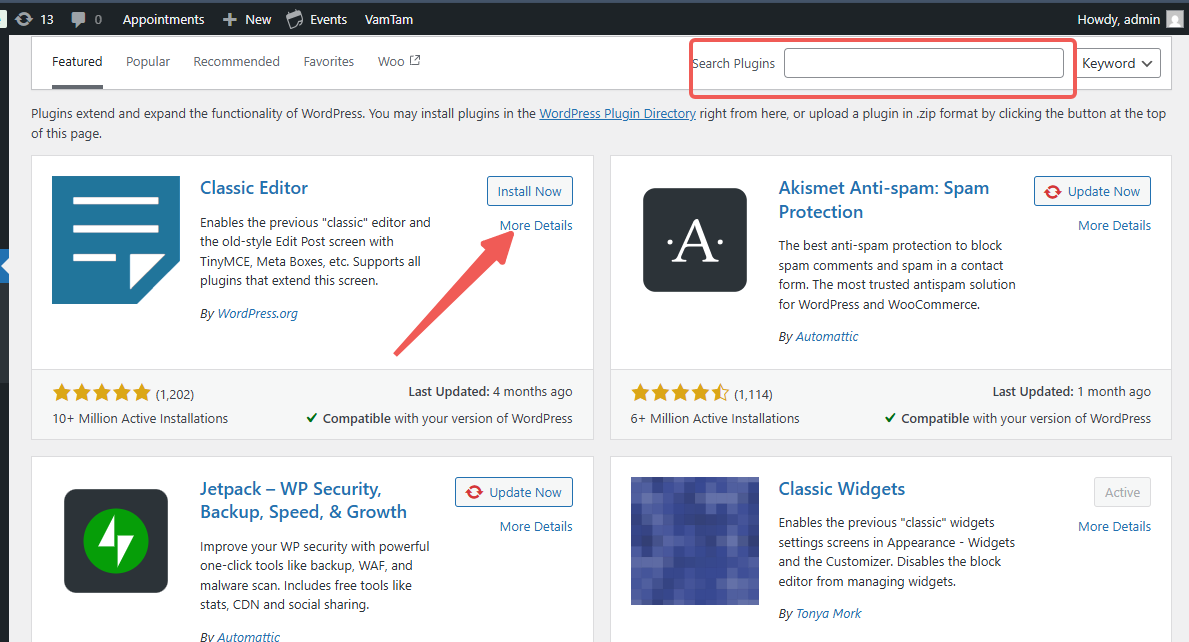
Search Plugins - Classic Editor - More Details

STEP 5: Click Install Now to begin downloading and installing the plugin.
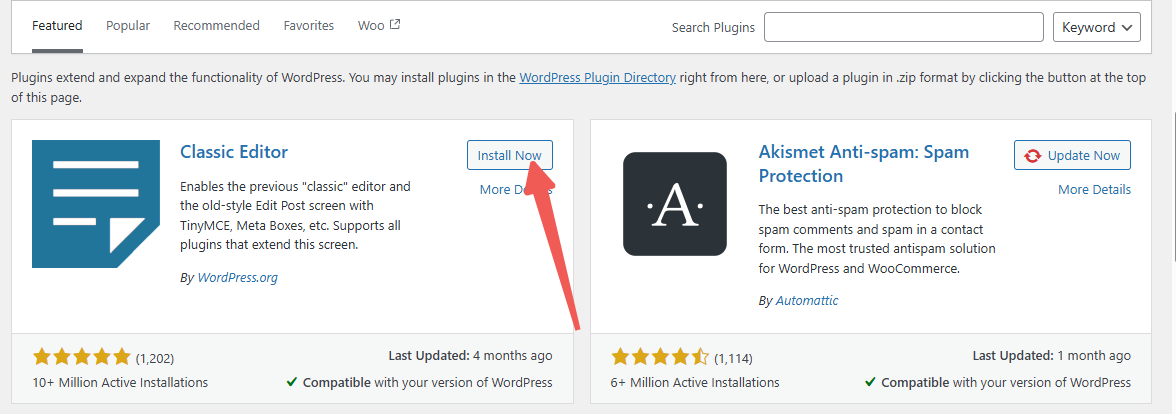
Classic Editor - Install Now

STEP 6: The tab will show an "Installing" status while the plugin is being installed.

STEP 7: Once the installation is complete, the button will change to Activate.

STEP 8: Click Activate.

After activation, some plugins may redirect you to the Installed Plugins page or open a new tab for setup or usage of the plugin.


Option 2: Uploading a WordPress Plugin via the Admin Dashboard

Some plugins, particularly premium ones, are provided in a .zip file. To install these plugins, ensure you obtain the full set of core files from a trusted source. You will need to upload the .zip file directly into your WordPress admin area and then activate it from the dashboard.

STEP 1: In your WordPress dashboard, click on Plugins in the left menu, then select Add New Plugin.
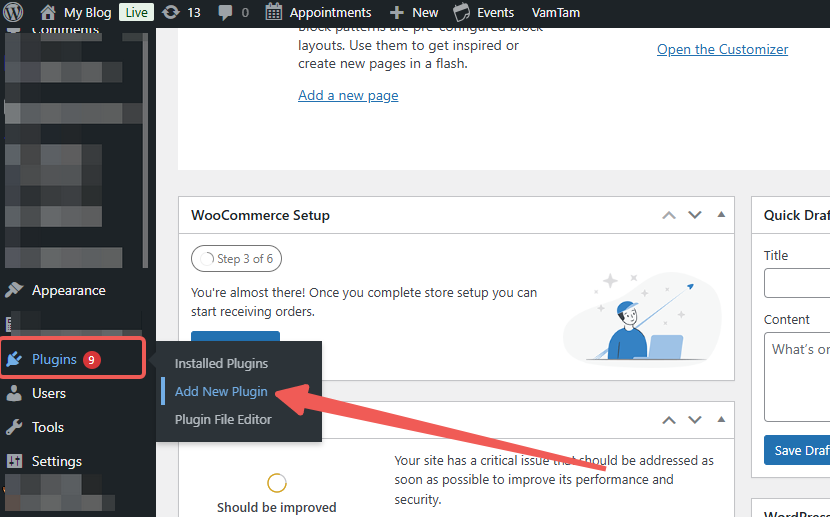
WordPress Admin Panel - Plugins - Add New Plugin

STEP 2: At the top of the page, click the Upload Plugin button.
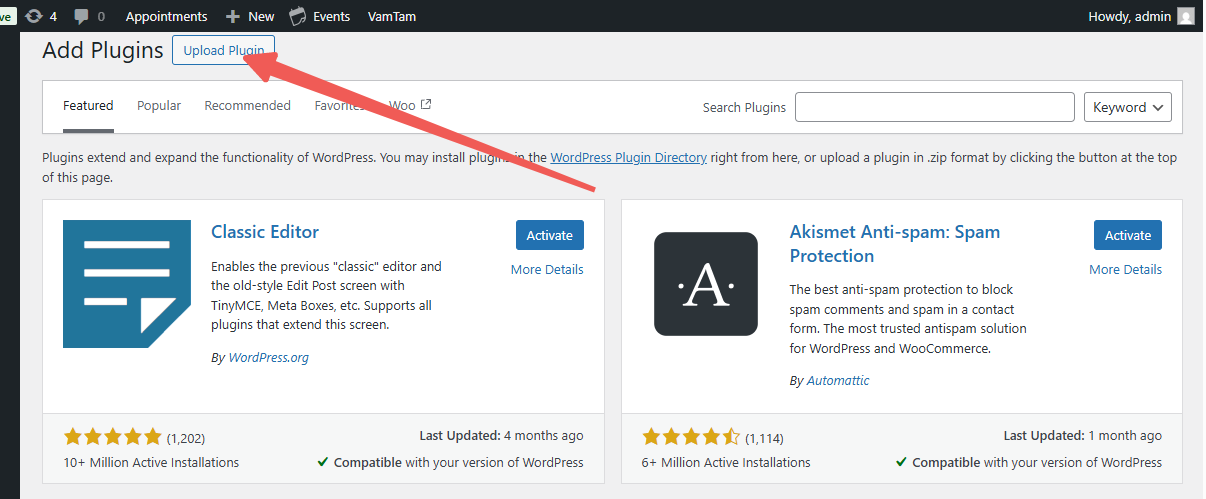
Add New Plugin - Upload Plugin

STEP 3: The upload form will appear. Click Choose File and select the plugin's .zip file.

STEP 4: After selecting the file, click Install Now.
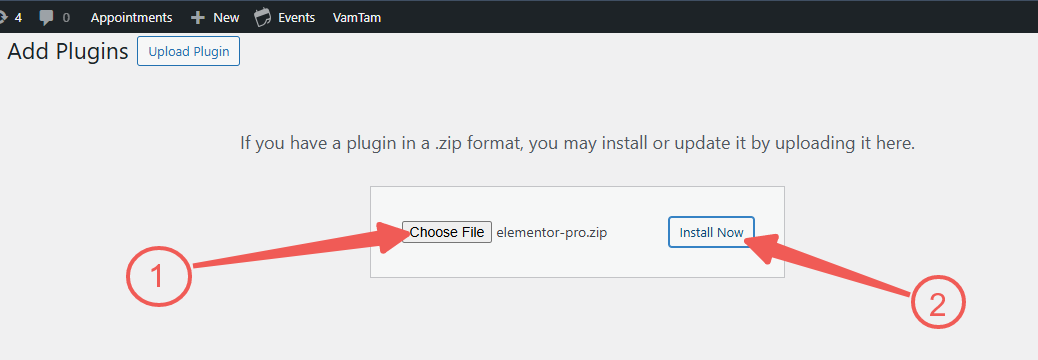
Upload Form - Choose File - Install Now

STEP 5: WordPress will begin the upload and installation process. Once done, you’ll see a status message with options to Activate Plugin and Return to Plugin Installer.

STEP 6: Click Activate Plugin to start using it.

You may need to adjust or configure specific settings within the plugin depending on the requirements of your website. The settings can differ for each plugin.


How to Deactivate a WordPress Plugin

Deactivating a plugin without permanently deleting it is commonly done for debugging purposes, bug fixes, or when the plugin is not needed temporarily. This method preserves your website's settings and configurations, allowing you to easily reactivate the plugin later if necessary.

It's important to note that deactivating a plugin means it's not being used for the time being. However, deactivated plugins can still pose a security risk as they might be exploited to run malicious code on your site. If you don't plan on using the plugin again soon, it’s recommended to uninstall it instead.

To deactivate a plugin:

STEP 1: Log in to your WordPress Admin Panel.

STEP 2: Navigate to Plugins and click on Installed Plugins.

WordPress Admin Panel - Plugins - Installed Plugins

STEP 3: Locate the plugin you want to deactivate. Click Deactivate beneath the plugin’s name. The plugin will automatically deactivate.

WordPress Plugin - Deactivate Plugin

Many WordPress plugins offer an option to completely uninstall themselves, though not all plugins provide this feature.


Permanently Uninstalling a WordPress Plugin

It's important to understand that installing and removing plugins can affect your WordPress setup, as plugins may alter your theme's code or the overall WordPress installation.

While most plugins can be uninstalled by following the steps outlined below, it’s advisable to refer to the plugin’s readme file for specific uninstallation instructions. For example, if a plugin requires adding code to the WordPress theme, you might need to manually edit the theme files to fully remove the plugin.

To uninstall a plugin:

STEP 1: Log in to your WordPress Admin Panel.

STEP 2: Go to Plugins.

STEP 3: Click on Installed Plugins, then find the plugin you want to uninstall.

WordPress Admin Panel - Plugins - Installed Plugins

STEP 4: Locate the plugin and click Delete beneath the plugin’s name.

STEP 5: A pop-up warning will appear. Click OK to confirm.

Delete Plugin - OK

Keep in mind that some plugins create additional files, database tables, or other elements upon activation. To ensure that all traces of the plugin are completely removed, refer to the article provided below for that specific plugin.


Was this answer helpful?

« Back