Account and user-level filters help manage incoming emails, ensuring better email organization and minimizing spam. LyteHosting's cPanel allows you to configure filters for individual email accounts on your domain, enabling you to discard spam, redirect messages, or process emails through a script.
The Account-Level Filter (also known as a Global Email Filter) applies email rules to all accounts under your cPanel. In contrast, the User-Level Filter (or Email Filter) allows you to set custom rules for a specific email address.
For optimal performance, it’s recommended to create multiple simple filters instead of one complex rule. The Exim mail server processes multiple smaller filters more efficiently than a single, lengthy rule.
Creating a Custom Account Filter
Follow these steps to add an account filter:
STEP 1: Log in to cPanel.
There are three methods to log into your cPanel.
- Method 1: Log in to your cPanel directly.
- Method 2: Log in to your cPanel through your Customer Portal.
Through your Customer Portal;
- Log in to your Customer Portal.
- Click on "Log in to cPanel".
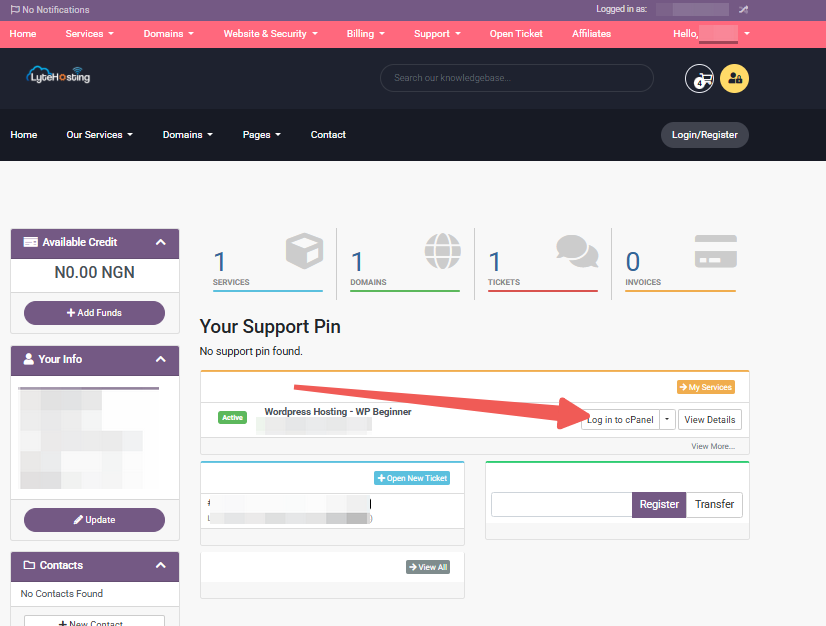
- Method 3: Log in using the details sent to your Email.
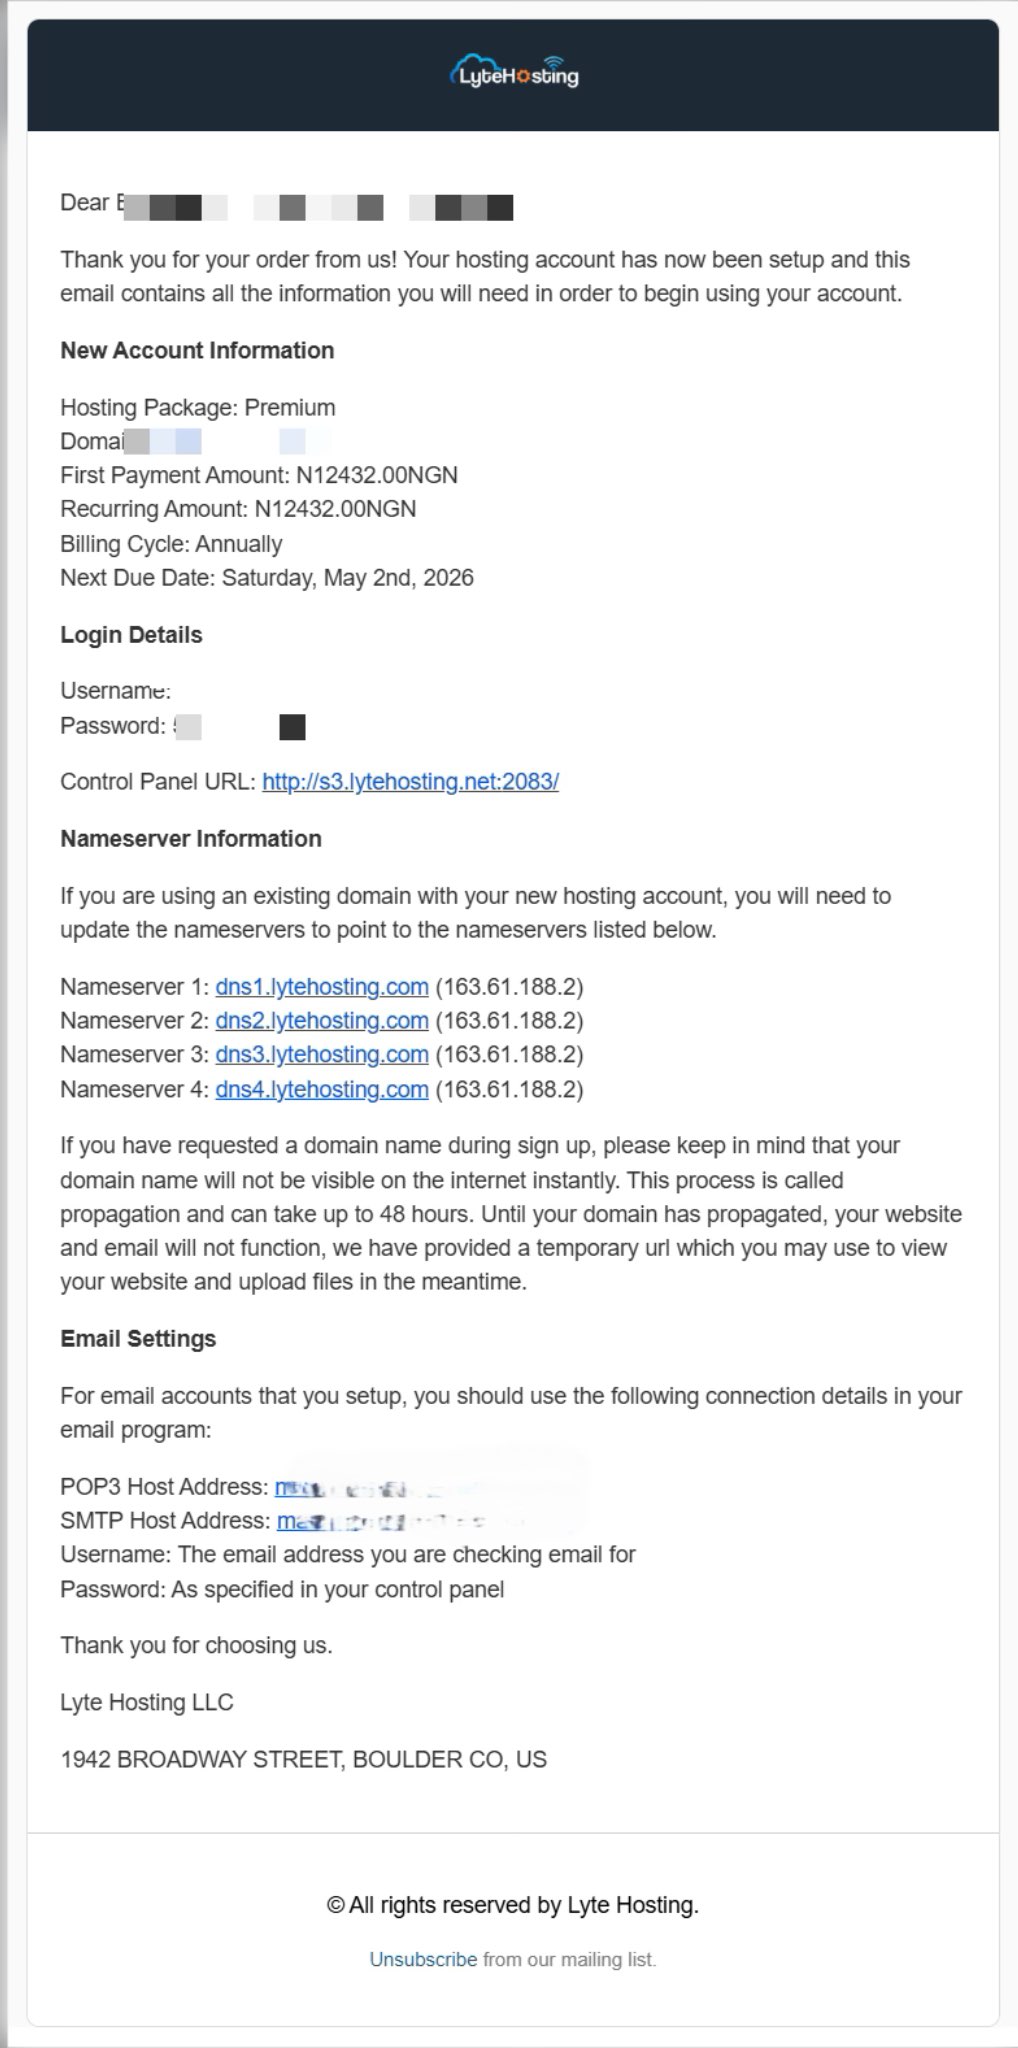
Through your Email;
- When you purchase a hosting plan, your cPanel login details (including username, password, and cPanel URL) are automatically sent to your registered email address. Simply check your inbox (or spam folder), locate the email, and use the provided credentials to access your cPanel.
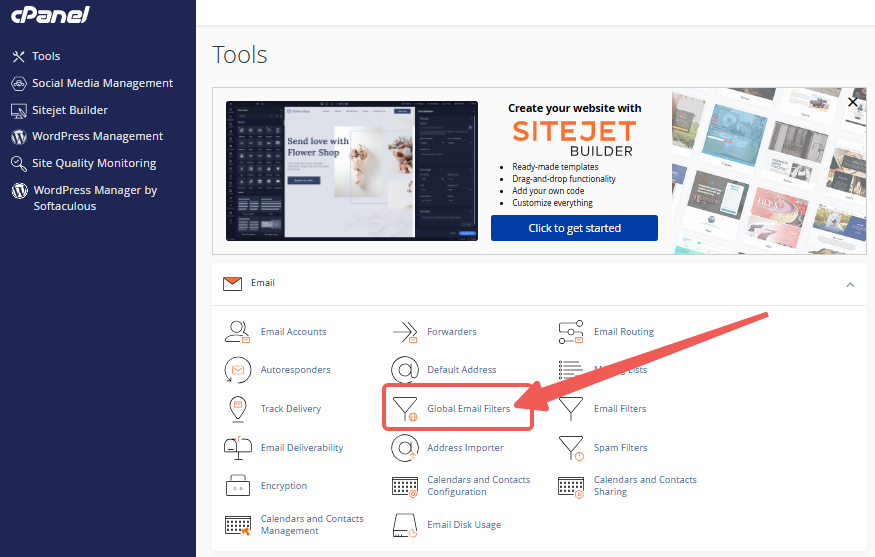
STEP 2: Locate the Email section and click on Global Email Filters.
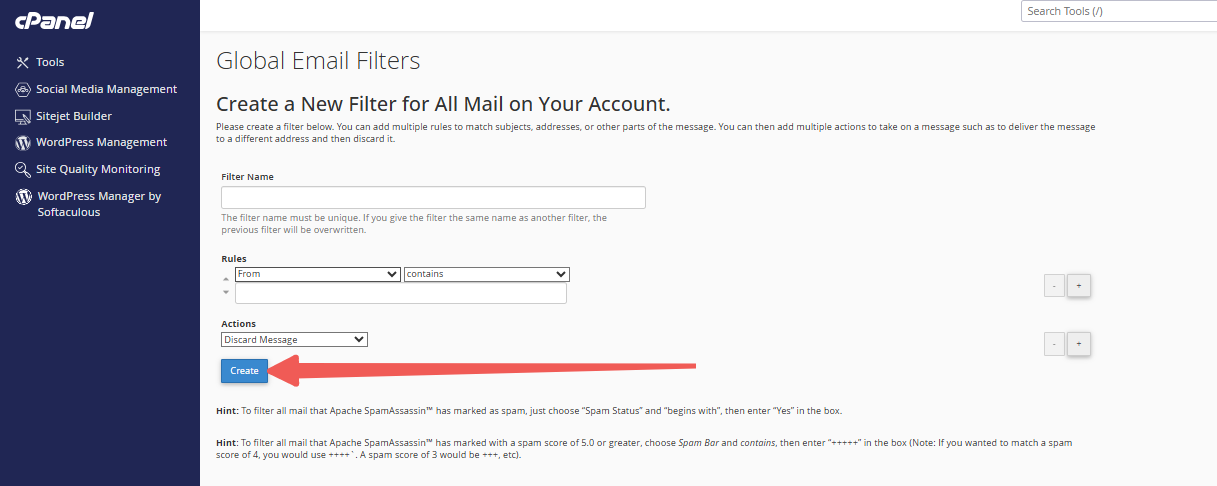
STEP 3: Click Create a New Filter to begin setting up your account-level filter.

STEP 4: Setting up an Account-Level Filter:
- In the Filter Name field, provide a name for your filter.
- Under the Rules section, choose a message characteristic from the dropdown menu:
- From: Address from which the message was sent
- Subject: Subject line of the message
- To: Address to which the message was sent
- Any Recipient: Any recipient on the message
- Reply: Address to which the reply will be sent
- Body: Body or content area of the message
- Any Header: Any header of the message
- Has Not Been Previously Delivered: Affects messages still in the delivery queue
- Is an Error Message: Affects error messages from auto-response systems
- List ID: Account’s mailing lists
- Spam Status: Spam status assigned by SpamAssassin (either "Yes" or "No")
- Spam Bar: Likelihood of spam based on SpamAssassin’s Spam Bar header
- Spam Score: Overall spam score assigned by SpamAssassin
- In the adjacent dropdown menu, choose the operator that fits your needs:
- contains: Contains the defined string
- matches regex: Matches a regular expression
- does not contain: Does not contain the defined string
- equals: Exactly matches the defined string
- begins with: Begins with the defined string
- ends with: Ends with the defined string
- does not begin: Does not begin with the defined string
- does not end with: Does not end with the defined string
- does not match: Does not match the defined string
For Spam Score:
- is above: Scores greater than the defined number
- is not above: Scores equal to or less than the defined number
- is below: Scores below the defined number
- is not below: Scores greater than or equal to the defined number
- Enter the specific filter or characteristics you wish to use. Regular expressions are accepted.
Example: To filter emails from example@spam.com, enter:
From equals example@spam.com
- Use the + or - buttons to add or remove additional rules.
- From the Actions dropdown menu, select the action for your filter:
- Discard Message: Discards the incoming message without a failure notice
- Redirect to Email: Redirects the message to another email address
- Fail With Message: Discards the message and sends a failure notice to the sender
- Stop Processing Rules: Skips all further filter rules
- Deliver to Folder: Delivers the message to a specific folder
- Pipe to a Program: Sends the message to a specified program
Note for Piping to a Program: Enter the path relative to your home directory. If the script requires an interpreter (e.g., PHP or Perl), omit the interpreter path and ensure your script is executable with the appropriate hashbang:
- #!/usr/local/bin/PHP -q for PHP
- #!/usr/bin/Perl for Perl
STEP 5: Click Create to initialize the filter.
Testing a Customer Account Filter
To ensure your account-level email filters work as expected, follow these steps:
STEP 1: Log in to cPanel (Refer to the steps above if you need guidance on accessing your cPanel).
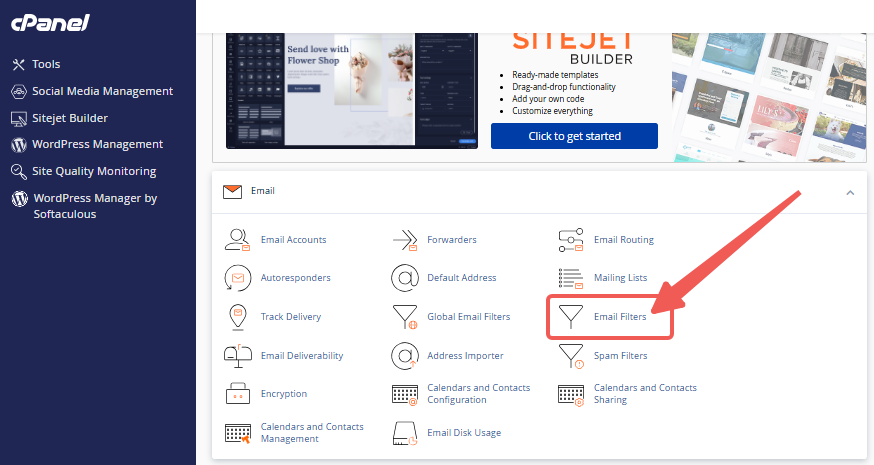
STEP 2: Locate the Email section and click on Email Filters.
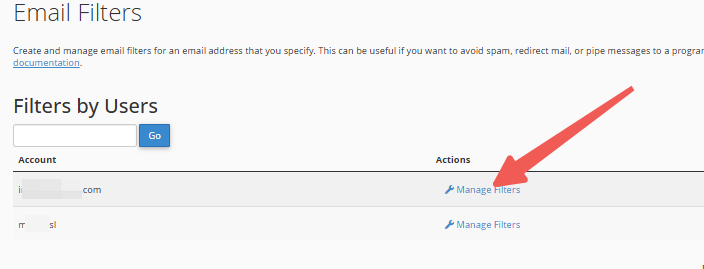
STEP 3: Find the email account you want to test and click Manage Filters.
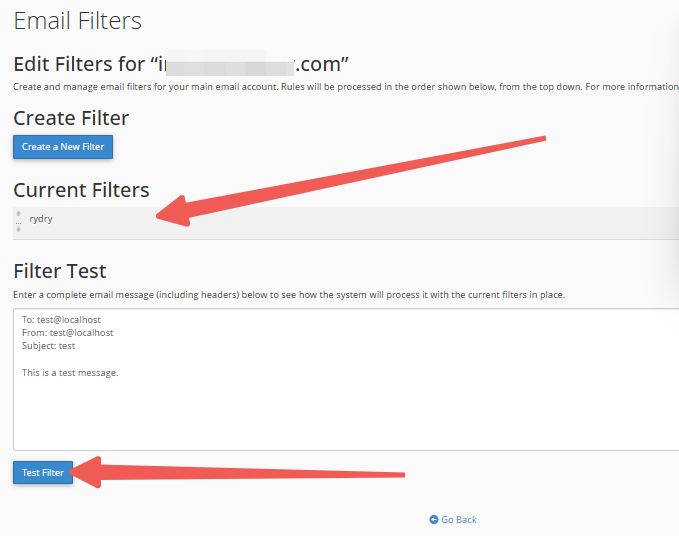
STEP 4: In the Filter Test textbox, type a test email message that includes the specific characters or words your filter is designed to catch.
STEP 5: Click Test Filter to apply the filter and proceed to the next page.
STEP 6: The next screen will show a summary of the actions taken by the filter. Review the results carefully to ensure the filter is working as expected and producing the desired outcome.
Creating a User-Level Filter
Follow these steps to add a user-level filter:
STEP 1: Log in to cPanel (Refer to the steps above if you need guidance on accessing your cPanel).
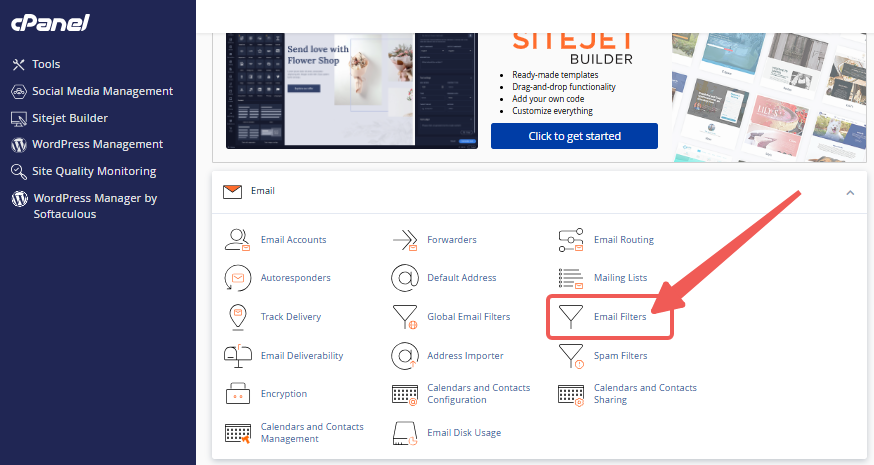
STEP 2: Locate the Email section. To create a user-level filter, navigate to Email Filters.
STEP 3: Locate the email account you want to test and click Manage Filters.
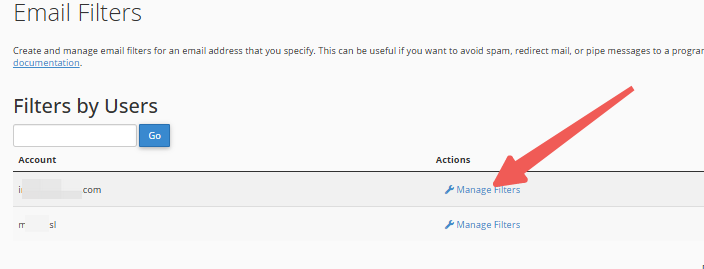
STEP 4: On the next page, click Create a New Filter to set up your custom email rule.
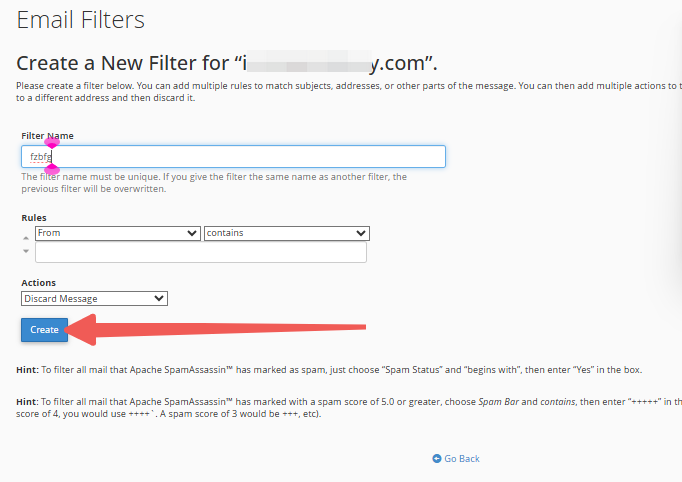
STEP 5: Setting up a User-Level Filter:
- In the Filter Name field, provide a name for your filter.
- Under the Rules section, choose a message characteristic from the first dropdown menu:
- From: Sender's address
- Subject: Subject line of the message
- To: Recipient's address
- Any Recipient: Any recipient on the message
- Reply: Address for the reply
- Body: Content area of the message
- Any Header: Any header of the message
- Has Not Been Previously Delivered: Affects messages still in the delivery queue
- Is an Error Message: Affects error messages from an auto-response system
- List ID: Mailing lists of the account
- Spam Status: Status assigned by SpamAssassin
- Spam Bar: Spam likelihood based on the Spam Bar
- Spam Score: Overall spam score assigned by SpamAssassin
- In the adjacent dropdown menu, choose an operator:
- contains: Contains the defined string
- matches regex: Matches a regular expression
- does not contain: Does not contain the defined string
- equals: Exactly matches the defined string
- begins with: Begins with the defined string
- ends with: Ends with the defined string
- does not begin: Does not begin with the defined string
- does not end with: Does not end with the defined string
- does not match: Does not equal the defined string
For Spam Score:
- is above: Scores greater than the defined number
- is not above: Scores equal to or less than the defined number
- is below: Scores below the defined number
- is not below: Scores greater than or equal to the defined number
- Enter the filter value or characteristics you want to use. (Regular expressions are accepted.)
Example: To filter emails from a specific sender:
From equals example@spam.com
- You can add or remove filter rules by clicking the + or - buttons.
- From the Actions dropdown menu, choose an action for your filter:
- Discard Message: Discards the incoming message without a notice
- Redirect to Email: Redirects the message to another email address
- Fail With Message: Discards the message and sends a failure notice to the sender
- Stop Processing Rules: Stops further processing of rules
- Deliver to Folder: Delivers the message to a specified folder
- Pipe to a Program: Sends the message to a specified program
Note for Piping to a Program: Enter the path relative to your home directory. If the script requires an interpreter (e.g., PHP or Perl), omit the interpreter path and ensure your script is executable with the appropriate hashbang.
- #!/usr/local/bin/PHP -q for PHP
- #!/usr/bin/Perl for Perl
STEP 6: Click Create to activate the filter.
Testing a User-Level Filter
To ensure your custom user-level email filters work as expected, follow these steps:
STEP 1: Log in to cPanel (Refer to the steps above if you need guidance on accessing your cPanel.)
STEP 2: Locate the Email section and click on Email Filters.
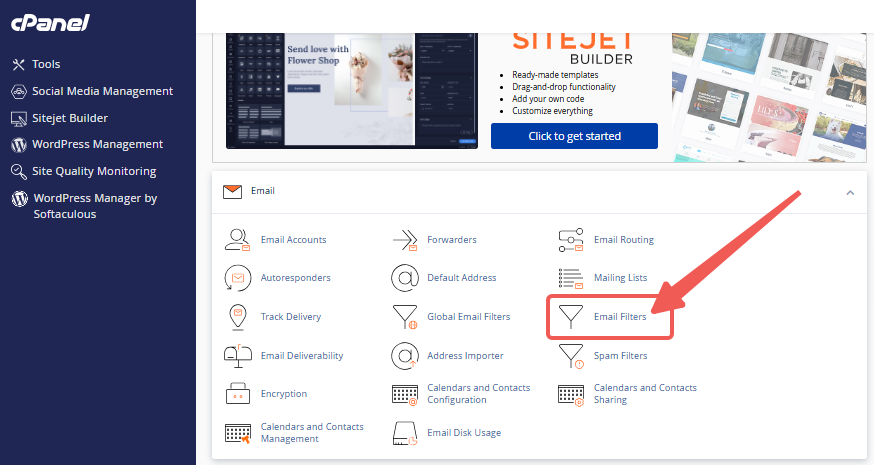
STEP 3: Locate the email account you want to test and click Manage Filters.
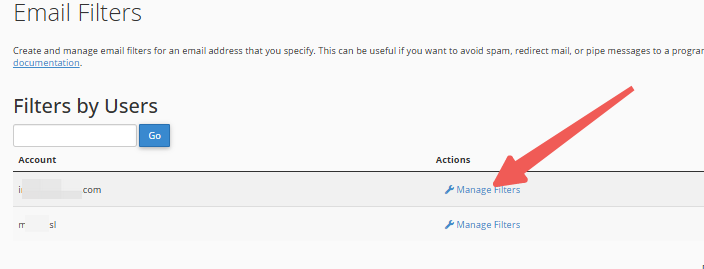
STEP 4: In the Filter Test textbox, input a test email message that includes the keywords or characters your filter is set to catch.
STEP 5: Click Test Filter to proceed to the next page where the filter will be applied.
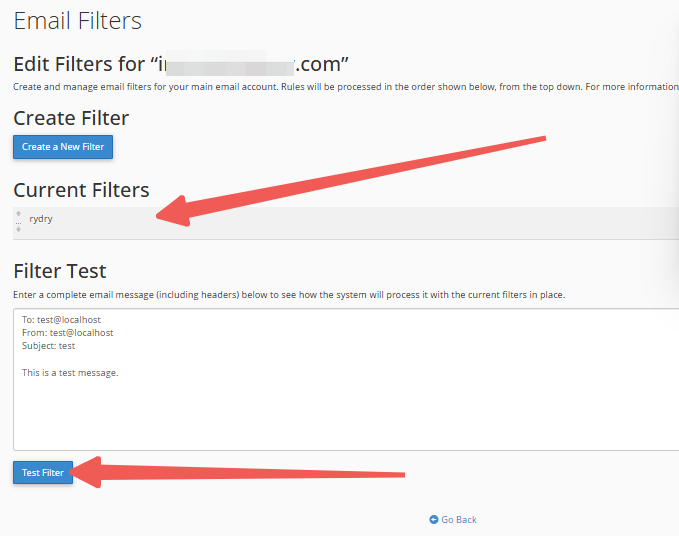
STEP 6: The next screen will display the results, summarizing the actions taken by the filter. Carefully review the information to ensure the filter is functioning as intended and producing the expected results.


