Keeping your WordPress website updated is one of the most effective ways to protect it from cyber threats. Outdated software, plugins, or themes often contain security vulnerabilities that hackers can exploit. By enabling automatic updates, you ensure that your website always runs the latest, most secure versions of WordPress components, without manual effort.
Importance of Updates
Every WordPress update (whether for the core, plugins, or themes) includes essential security patches, bug fixes, and performance improvements. Ignoring these updates leaves your website exposed to potential attacks. This means if your website isn’t updated, it’s not safe.
To maintain a secure and high-performing WordPress website, make sure to regularly update:
- WordPress Core
- Installed Plugins
- Active Theme
- PHP Version
How to Enable Automatic Updates in WordPress
You can easily set up automatic updates for your WordPress core, plugins, and themes directly from your dashboard.
STEP 1: Enable Automatic Updates for WordPress Core
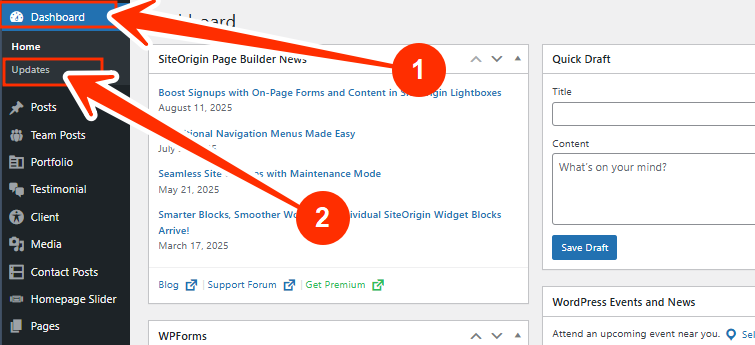
1. Log in to your WordPress Admin Dashboard.
2. Go to Dashboard, and click on Updates.
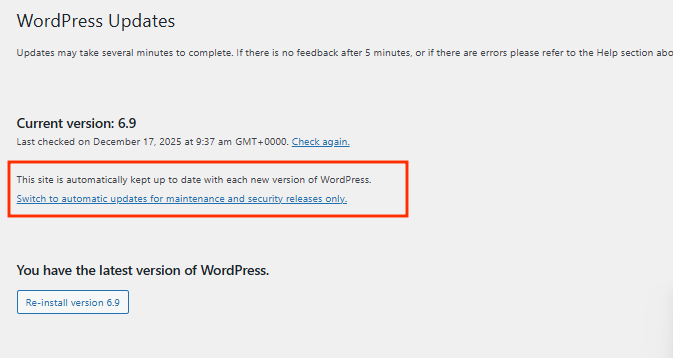
3. You’ll see the message:
“This site is automatically kept up to date with maintenance and security releases of WordPress only.”
4. Click on “Switch to automatic updates for maintenance and security releases only” to ensure your site receives all core updates automatically.
STEP 2: Enable Automatic Updates for Themes
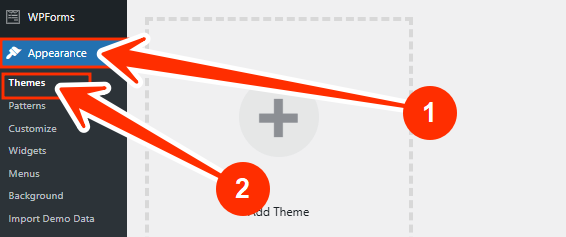
1. Log in to your WordPress Admin Dashboard.
2. Go to Appearance, and click on Themes.
3. Click on a theme thumbnail to open the details modal.
4. Below the author’s name, click on the “Enable auto-updates” link.

5. Repeat this for every theme installed on your website.
STEP 3: Enable Automatic Updates for Plugins
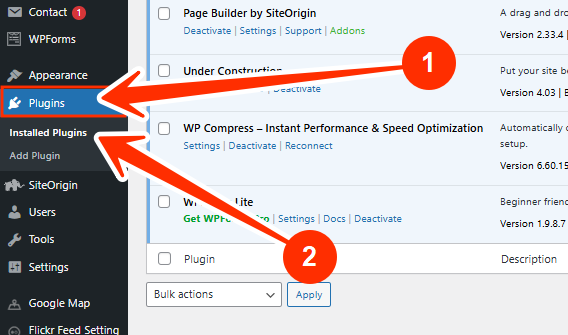
1. Log in to your WordPress Admin Dashboard.
2. Go to Plugins, and click on Installed Plugins.
3. In the “Automatic update” column, locate the action link beside each plugin.
4. Click on “Enable auto-updates” for each plugin.
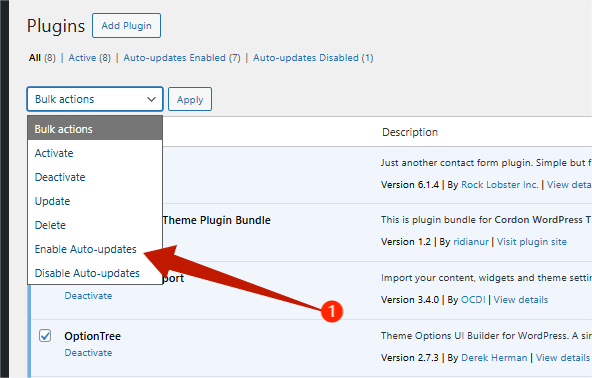
5. You can disable auto-updates anytime by clicking the same link again.
Additional Tip: Keep PHP Updated
Your website’s PHP version also impacts its security and performance. Always ensure you’re running a supported PHP version. If you’re unsure how to update PHP, contact your hosting provider for assistance.
If you need help, kindly reach out to our support team. We’re always here for you.


