Each time you visit a website for the first time, your browser stores (caches) its data. This caching process helps reduce load times by preventing website files—such as images, videos, CSS, and JavaScript—from being downloaded again each time you navigate using the Back or Forward buttons.
To view recent updates on your website, you may need to clear your browser cache or manually refresh the page using these keyboard shortcuts:
- Linux: F5
- Mac/Apple: Command (⌘) + R or Apple + R
- Windows: CTRL + F5
In addition to force-refreshing the page, you can clear your browser cache through other methods. The steps vary depending on the browser you are using. Refer to the instructions specific to your browser for detailed steps on clearing the cache.
Important: If you are in a support chat, clearing your cookies along with your cache may disconnect you from the chat session.
Clearing Cache in Microsoft Edge
Microsoft Edge, launched on January 15, 2020, is compatible with all supported versions of Windows and macOS. Microsoft highlights Edge for its speed, performance, and high compatibility with websites and extensions, along with built-in privacy and security features. For further details, refer to Microsoft's official documentation.
Before clearing browsing data, ensure that sync is turned off to prevent synced items from being removed across all connected devices.
Steps to Clear Cache in Edge:
STEP 1: Open Microsoft Edge.
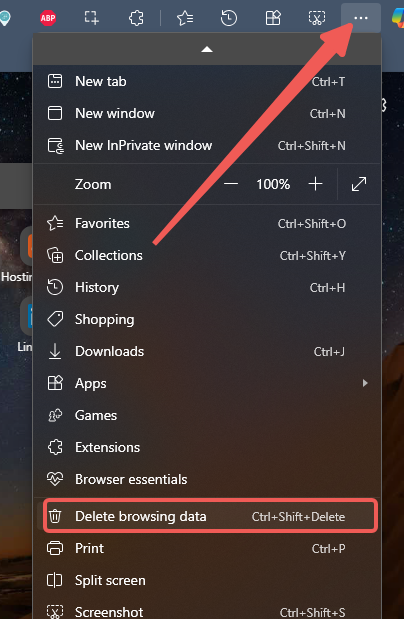
STEP 2: Click the three-dot menu (⋯) in the top-right corner.
STEP 3: Choose Delete Browsing Data.

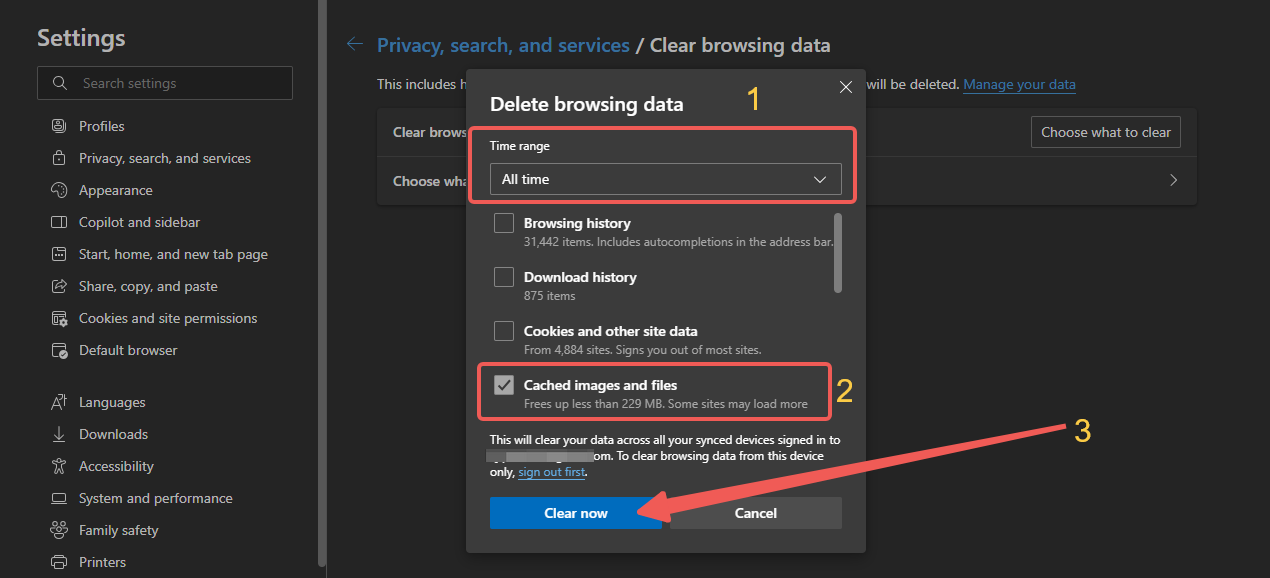
STEP 4: Choose what to clear.
STEP 5: In the pop-up window, select a time range from the dropdown menu.
STEP 6: Choose the types of data you want to delete. For instance, you may opt to clear Cookies and other site data and Cached images and files. Refer to Microsoft's documentation for descriptions of each data type.
STEP 7: Click Clear now.

If the cache is not clearing successfully, repeat the steps above and restart your computer.
Clearing Cache in Firefox
Firefox provides two methods to clear the cache manually. Additionally, you can configure it to clear the cache automatically.
Method 1: Clear Cache via the History Menu
STEP 1: Open Firefox.
STEP 2: Click the menu icon (☰) in the top-right corner.
STEP 3: Select History from the options.
STEP 4: Click Clear Recent History.
STEP 5: In the Time range to clear dropdown, select Everything.
STEP 6: Check the Cache and uncheck all other items.
STEP 7: Click OK to confirm.
Method 2: Clear Cache via Settings
STEP 1: Open Firefox.
STEP 2: Click the menu icon (☰) in the top-right corner.
STEP 3: Select Settings.
STEP 4: Navigate to Privacy & Security in the left panel.
STEP 5: In the Cookies and Site Data section, click Clear Data.
STEP 6: Check Cached Web Content and leave Cookies and Site Data unchecked. For more details on managing site data, refer to Mozilla’s documentation.
STEP 7: Click Clear to complete the process.
STEP 8: You can now close the about:preferences page, as Firefox automatically saves any changes made.
Automatically Clear Cache in Firefox
Firefox allows you to automatically clear the cache each time you close the browser.
Steps to Enable Automatic Cache Clearing:
STEP 1: Open Firefox.
STEP 2: Click the menu icon (☰) in the top-right corner.
STEP 3: Select Settings.
STEP 4: Navigate to Privacy & Security in the left panel.
STEP 5: Scroll down to the History section.
STEP 6: From the Firefox dropdown menu, select Use Custom Settings for history.
STEP 7: Check Clear history when Firefox closes, then click the Settings button next to it.
STEP 8: In the Settings for Clearing History window, check Cache and leave other options unchecked. For more details on additional settings, refer to Mozilla’s documentation.
STEP 9: Click OK to save changes.
STEP 10: Close the about:preferences page—Firefox will automatically apply your settings.
If you continue experiencing issues with cache clearing, repeat these steps and restart your computer.
Clearing Cache in Google Chrome
Google Chrome provides two methods to clear the browser cache.
Method 1: Using More Tools
STEP 1: Open Google Chrome.
STEP 2: Click the three-dot menu (⋮) in the top-right corner.
STEP 3: Select More Tools, then click Clear browsing data.
STEP 4: In the Clear browsing data pop-up, under the Basic tab, choose All time from the Time Range dropdown menu.
STEP 5: Check the data types you want to clear.
Note: Selecting Cookies and other site data will sign you out of other websites.
STEP 6: Click Clear data.
STEP 7: Close the Settings page.
Method 2: Using Settings Search
STEP 1: Open Google Chrome.
STEP 2: Click the three-dot menu (⋮) in the top-right corner.
STEP 3: Select Settings.
STEP 4: In the Search settings box at the top, type "cache" or click the magnifying glass icon to search.
STEP 5: Click Clear browsing data from the search results.
STEP 6: In the Clear browsing data pop-up, select All Time from the Time Range dropdown menu.
STEP 7: Check the data types you want to remove.
Selecting Cookies and other site data will log you out of other websites.
STEP 8: Click Clear data.
STEP 9: Close the Settings page.
If the cache does not clear successfully, repeat the steps above and restart your computer.
Clearing Cache in Internet Explorer 11
Note: Microsoft ended support for Internet Explorer on June 15, 2020. Consider switching to a modern browser like Edge, Chrome, or Firefox for better security and performance.
Steps to Clear Cache in Internet Explorer 11:
STEP 1: Open Internet Explorer 11.
STEP 2: Click the gear icon ⚙ in the top-right corner.
STEP 3: Select Safety, then click Delete browsing history.
STEP 4: Check Temporary Internet files and website files (Uncheck other options if you don’t want to delete them).
STEP 5: Click Delete.
STEP 6: Wait for the confirmation message at the bottom of the page.
If the cache doesn’t clear properly, repeat the steps and restart your computer.
Clearing Cache in Opera Browser
Steps for Newer Opera Versions:
STEP 1: Open Opera.
STEP 2: Go to Settings.
STEP 3: Click Advanced (left sidebar), then select Privacy and Security.
STEP 4: Under Privacy and Security, click Clear browsing data.
STEP 5: Choose a time range and select the types of data you want to clear.
STEP 6: Click Clear data.
For Opera 8.0 and Below
STEP 1: Click Edit from the Opera menu bar.
STEP 2: Select File > Preferences.
STEP 3: Open the History and Cache menu.
STEP 4: Click Cache, then OK.
If issues persist, repeat the steps and restart your computer.
Clearing Cache in Safari Browser
For Newer Safari Versions:
STEP 1: Open Safari.
STEP 2: Go to Settings and select Safari.
STEP 3: Click Clear History and Website Data.
- Clearing history, cookies, and browsing data won't affect your AutoFill information.
STEP 4: Confirm the action if prompted.
For Older Safari Versions (Mac OS X)
Safari 6 and Later
STEP 1: Open Safari, then go to Menu > Preferences.
STEP 2: Select the Advanced tab.
STEP 3: Enable Show Develop menu by checking the box.
STEP 4: Close Preferences.
STEP 5: Click Develop > Empty Caches from the top menu.
Safari 1.5 - 5.x
STEP 1: Click Safari menu > Empty Cache.
STEP 2: When prompted, click Empty to confirm.
If issues persist, repeat the steps and restart your computer.


